Register a domain and point DNS to EC2 (WA101)
Prerequisites
- An EC2 instance running the lab web server (e.g.
projectx-prod-websvr-public) with a public IPv4 address. - The Threat Intelligence Dashboard deployed or ready to deploy (see Deploy the threat intelligence dashboard (Fly.io + Neon) and Deploy CI/CD Using Github). For Fly.io, use a CNAME to your
*.fly.devapp instead of an A record to EC2. - SSH access to the instance (example):
- Optional but recommended: an Elastic IP attached to the instance so the public IP does not change when you stop/start the VM (see Step 2 — Confirm your EC2 public IP).
You do not need a domain to complete CI/CD—GitHub Actions can keep using EC2_HOST as an IP address. The domain is for a portfolio-friendly URL in the browser (e.g. https://threatintel.yourdomain.com).
Network topology
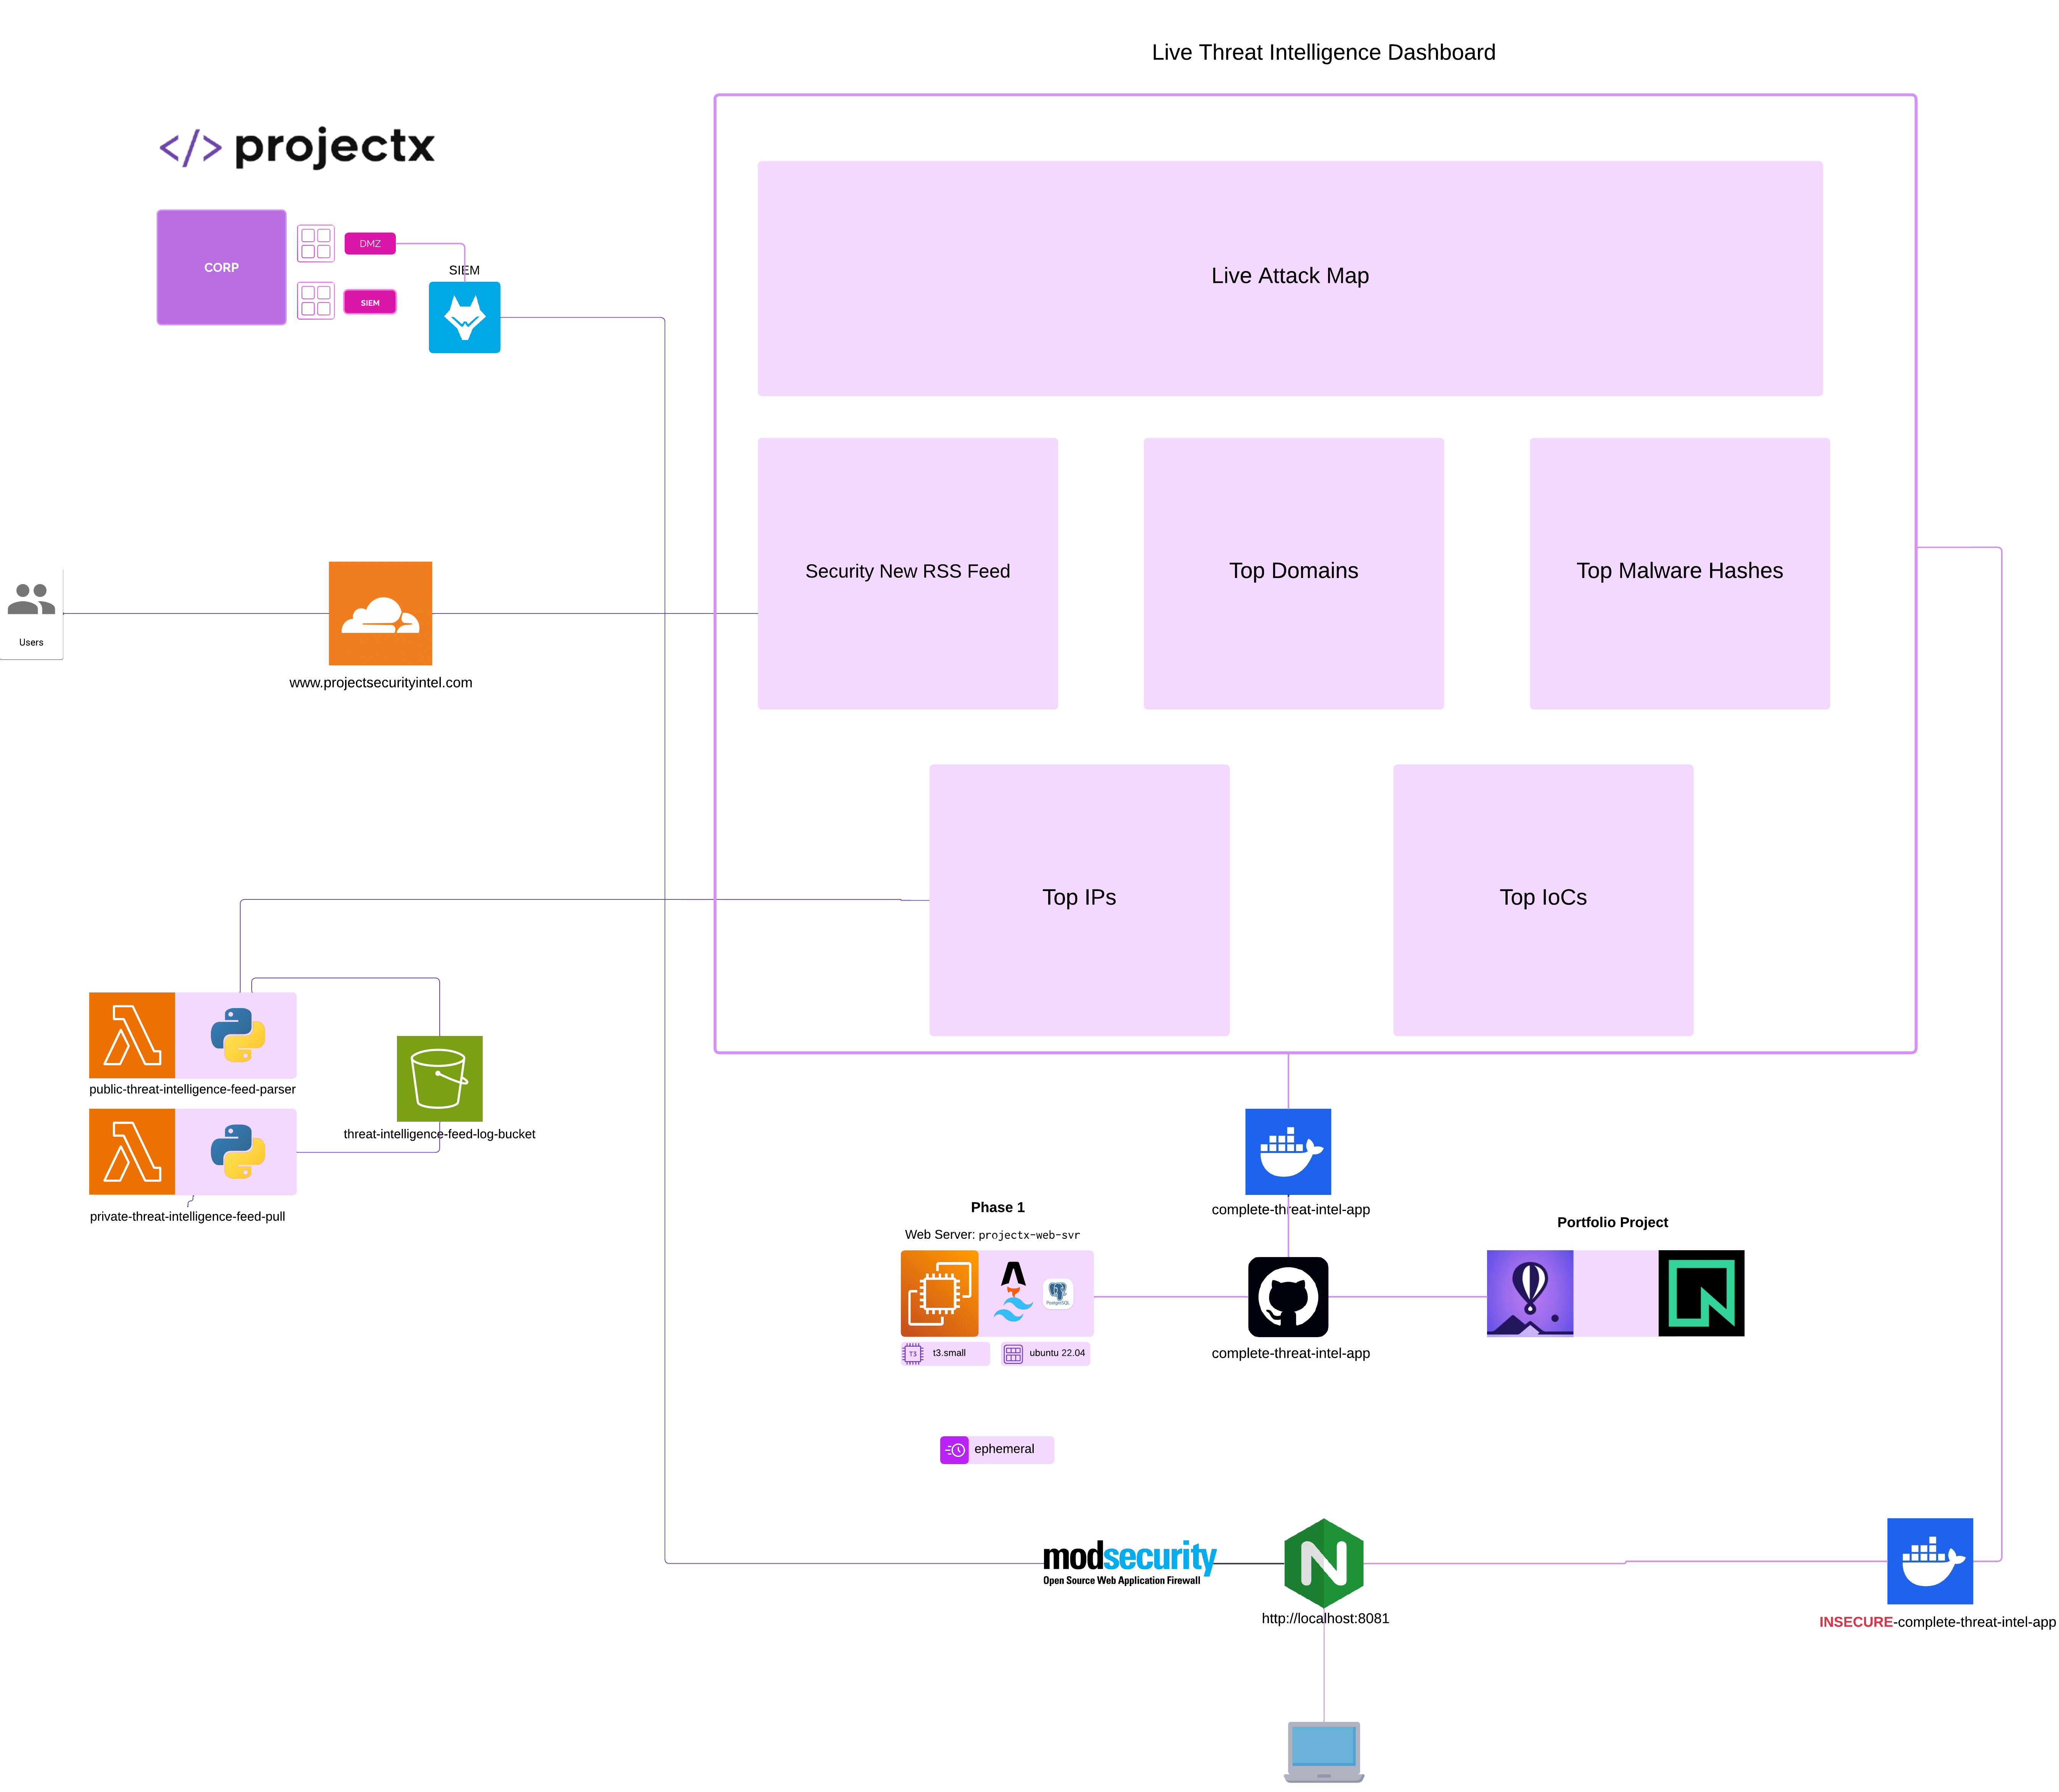
After this guide, DNS resolves your hostname to the EC2 public IP (legacy path) or to Fly.io (recommended—see personal_project_deploy.md). On EC2, nginx on port 80 forwards to the Astro app on 4321; on Fly, HTTPS is handled by the platform.
What you are configuring
| Piece | Role |
|---|---|
| Domain registrar | You own a name (e.g. yourname.dev) |
| Cloudflare DNS | Maps @ (apex) and optionally www to your EC2 IPv4 |
| AWS security group | Allows inbound 80 / 443 to the instance |
| nginx (next guide) | Listens on 80 and proxies to the dashboard |
This page covers Cloudflare + DNS + security group only—not nginx or TLS on the server.
Step 1 — Create a Cloudflare account
- Go to https://dash.cloudflare.com/sign-up.
- Create an account and verify your email.
- Sign in to the Cloudflare dashboard.
Step 2 — Confirm your EC2 public IP
You need the public IPv4 that the internet uses to reach your instance—not a private 10.x address.
In the AWS console
- Open EC2 → Instances.
- Select your web server instance.
- Copy Public IPv4 address (example lab value:
18.223.0.147—yours will differ).
On the instance (optional check)
The output should match Public IPv4 in the console.
Elastic IP (recommended)
If the instance only has an ephemeral public IP, it can change after stop/start. That breaks DNS until you update Cloudflare.
- EC2 → Elastic IPs → Allocate Elastic IP address.
- Actions → Associate Elastic IP address → choose your instance.
- Use the Elastic IP as the DNS target from now on (update the A record if you already pointed at the old IP).
Step 3 — Register a domain in Cloudflare
You can register a new domain through Cloudflare or add a domain you already own at another registrar.
Option A — Register a new domain (simplest for labs)
- In Cloudflare, go to Domain Registration → Register Domains (or Register from the home page).
- Search for an available name (e.g.
yourname-threatintel.com,.dev,.net). - Complete purchase and registration (pricing varies by TLD).
- Cloudflare automatically adds the zone to your account and sets nameservers to Cloudflare.
Skip to Step 4 — Add DNS records.
Option B — Use a domain registered elsewhere
- Cloudflare → Add a site → enter your domain (e.g.
example.com) → continue with the Free plan. - Cloudflare shows two nameservers (e.g.
ada.ns.cloudflare.com,bob.ns.cloudflare.com). - At your current registrar (GoDaddy, Namecheap, Google Domains, etc.), replace the domain’s nameservers with Cloudflare’s.
- Wait until Cloudflare shows the zone as Active (often 5–30 minutes; up to 24 hours in rare cases).
DNS for the dashboard will be managed in Cloudflare → DNS → Records once the zone is active.
Step 4 — Add DNS records pointing to EC2
Open Cloudflare → your domain → DNS → Records.
Replace YOUR_EC2_PUBLIC_IP with the IPv4 from Step 2 (or your Elastic IP).
Apex (root) — required
| Type | Name | Content | Proxy status | TTL |
|---|---|---|---|---|
| A | @ |
YOUR_EC2_PUBLIC_IP |
See below | Auto |
- Name
@means the apex:https://yourdomain.com(no subdomain). - Content must be an IPv4 address, not
http://and not a port.
Proxy status (orange cloud vs grey cloud):
| Mode | Icon | When to use in this lab |
|---|---|---|
| Proxied | Orange cloud | After deploy guide nginx is on :80; use Full or Full (strict) SSL once the origin has a certificate |
| DNS only | Grey cloud | Easiest while testing direct IP and first nginx setup; traffic goes straight to EC2 |
For the first end-to-end test with nginx, DNS only (grey cloud) avoids Cloudflare SSL mode mismatches. You can enable the orange cloud later.
Optional — www
Choose one:
| Type | Name | Content | Notes |
|---|---|---|---|
| CNAME | www |
@ |
www.yourdomain.com → same apex target |
| A | www |
YOUR_EC2_PUBLIC_IP |
Same IP as apex; no CNAME indirection |
Optional — dashboard subdomain
Many portfolios use a dedicated host:
| Type | Name | Content |
|---|---|---|
| A | dashboard |
YOUR_EC2_PUBLIC_IP |
Then browse to http://dashboard.yourdomain.com after nginx is configured for that server_name (covered in deploy guide).
Click Save for each record.
Step 5 — Open AWS security group ports
DNS alone is not enough—the instance must accept HTTP (and later HTTPS) from the internet.
- EC2 → your instance → Security tab → click the security group.
- Edit inbound rules → add (or confirm):
| Type | Port | Source | Purpose |
|---|---|---|---|
| HTTP | 80 | 0.0.0.0/0 |
Browser / Cloudflare → nginx |
| HTTPS | 443 | 0.0.0.0/0 |
TLS (after cert setup in deploy guide) |
| SSH | 22 | Your IP or lab range | Administration (already present in most labs) |
- Save rules.
Keep PostgreSQL (5432) and other data ports closed to the public internet—only the app ports above should be world-reachable.
Step 6 — Verify DNS resolution
Wait a few minutes after saving records, then check from your laptop:
Windows (PowerShell):
macOS / Linux:
You should see YOUR_EC2_PUBLIC_IP.
If you used Proxied (orange cloud), dig may show Cloudflare anycast IPs instead of EC2—that is expected. Confirm in Cloudflare that the A record’s content is still your EC2 IP, and test http://YOUR_EC2_PUBLIC_IP directly.
Quick connectivity check (before nginx)
- If nothing listens on 80 yet, connection refused or timeout is normal until deploy guide.
- The dashboard on 4321 is separate:
http://YOUR_EC2_PUBLIC_IP:4321(if the security group allows it—labs often do not expose 4321 publicly).
Step 7 — Cloudflare SSL/TLS (when using orange cloud)
Skip this section if records are DNS only (grey cloud) until nginx and certificates are working.
- Cloudflare → your domain → SSL/TLS.
- While the origin has no certificate yet but nginx listens on 80 only:
- Flexible — HTTPS between visitor and Cloudflare, HTTP Cloudflare → EC2 (quick demo; not ideal long term).
- After Let’s Encrypt (or another cert) on EC2:
- Full or Full (strict) — encrypt visitor → Cloudflare → origin.
Mis-matched modes cause redirect loops or 522 errors. Prefer grey cloud until deploy guide completes HTTPS on the server, then switch to Full (strict) + orange cloud.
Step 8 — What works after DNS (and what does not)
| URL | After DNS only | After deploy guide (nginx on :80) |
|---|---|---|
http://YOUR_EC2_PUBLIC_IP:4321 |
App if port open | Still works if exposed |
http://YOUR_EC2_PUBLIC_IP |
Needs nginx | Dashboard |
http://yourdomain.com |
Needs nginx | Dashboard |
https://yourdomain.com |
Needs cert + nginx or Cloudflare proxy | Portfolio URL |
GitHub Actions: you can leave EC2_HOST as the IP (or Elastic IP). CI/CD does not require the domain name.
Checklist
- [ ] Cloudflare account created; domain registered or nameservers pointed to Cloudflare
- [ ] A record
@→ EC2 public IPv4 (Elastic IP recommended) - [ ] Optional www or dashboard records added
- [ ] Security group allows 80 and 443 inbound
- [ ]
dig/Resolve-DnsNamereturns expected IP (or Cloudflare proxy understood) - [ ] Ready for Deploy the threat intelligence application (nginx, port 80, HTTPS)
Troubleshooting
| Symptom | Likely cause | Fix |
|---|---|---|
| Domain does not resolve | Nameservers not updated (Option B) | Confirm registrar uses Cloudflare NS; wait for Active zone |
| Wrong IP in browser | Old A record or changed EC2 IP | Update A record; attach Elastic IP |
dig shows Cloudflare IPs, not EC2 |
Proxied record | Normal; verify A record content in dashboard; test origin IP directly |
| Connection timeout on domain | Security group blocks 80 | Add HTTP/HTTPS inbound rules |
| Site works on IP:4321 but not on domain | No nginx on 80 | Complete deploy guide |
| 522 / 525 with orange cloud | SSL mode vs origin cert | Use grey cloud until origin TLS works; set Full (strict) |
| Works then breaks after EC2 stop/start | Ephemeral IP changed | Elastic IP + update DNS |
Reference
| Topic | Guide |
|---|---|
| GitHub deploy to EC2 | Deploy CI/CD Using Github |
| nginx, port 80, HTTPS | Deploy the threat intelligence application |
| Optional nav menu | Optional navigation menu |
| Cloudflare DNS docs | Manage DNS records |
| Elastic IP | Associate an Elastic IP address |