Prerequisites
projectx-prod-vpchas been created with subnets configured.projectx-prod-jumpboxEC2 instance exists and is accessible.projectx-prod-websvrEC2 instance exists.My-Desktop-Key-Pairkey pair exists.- AWS CLI configured with appropriate credentials.
Network Topology
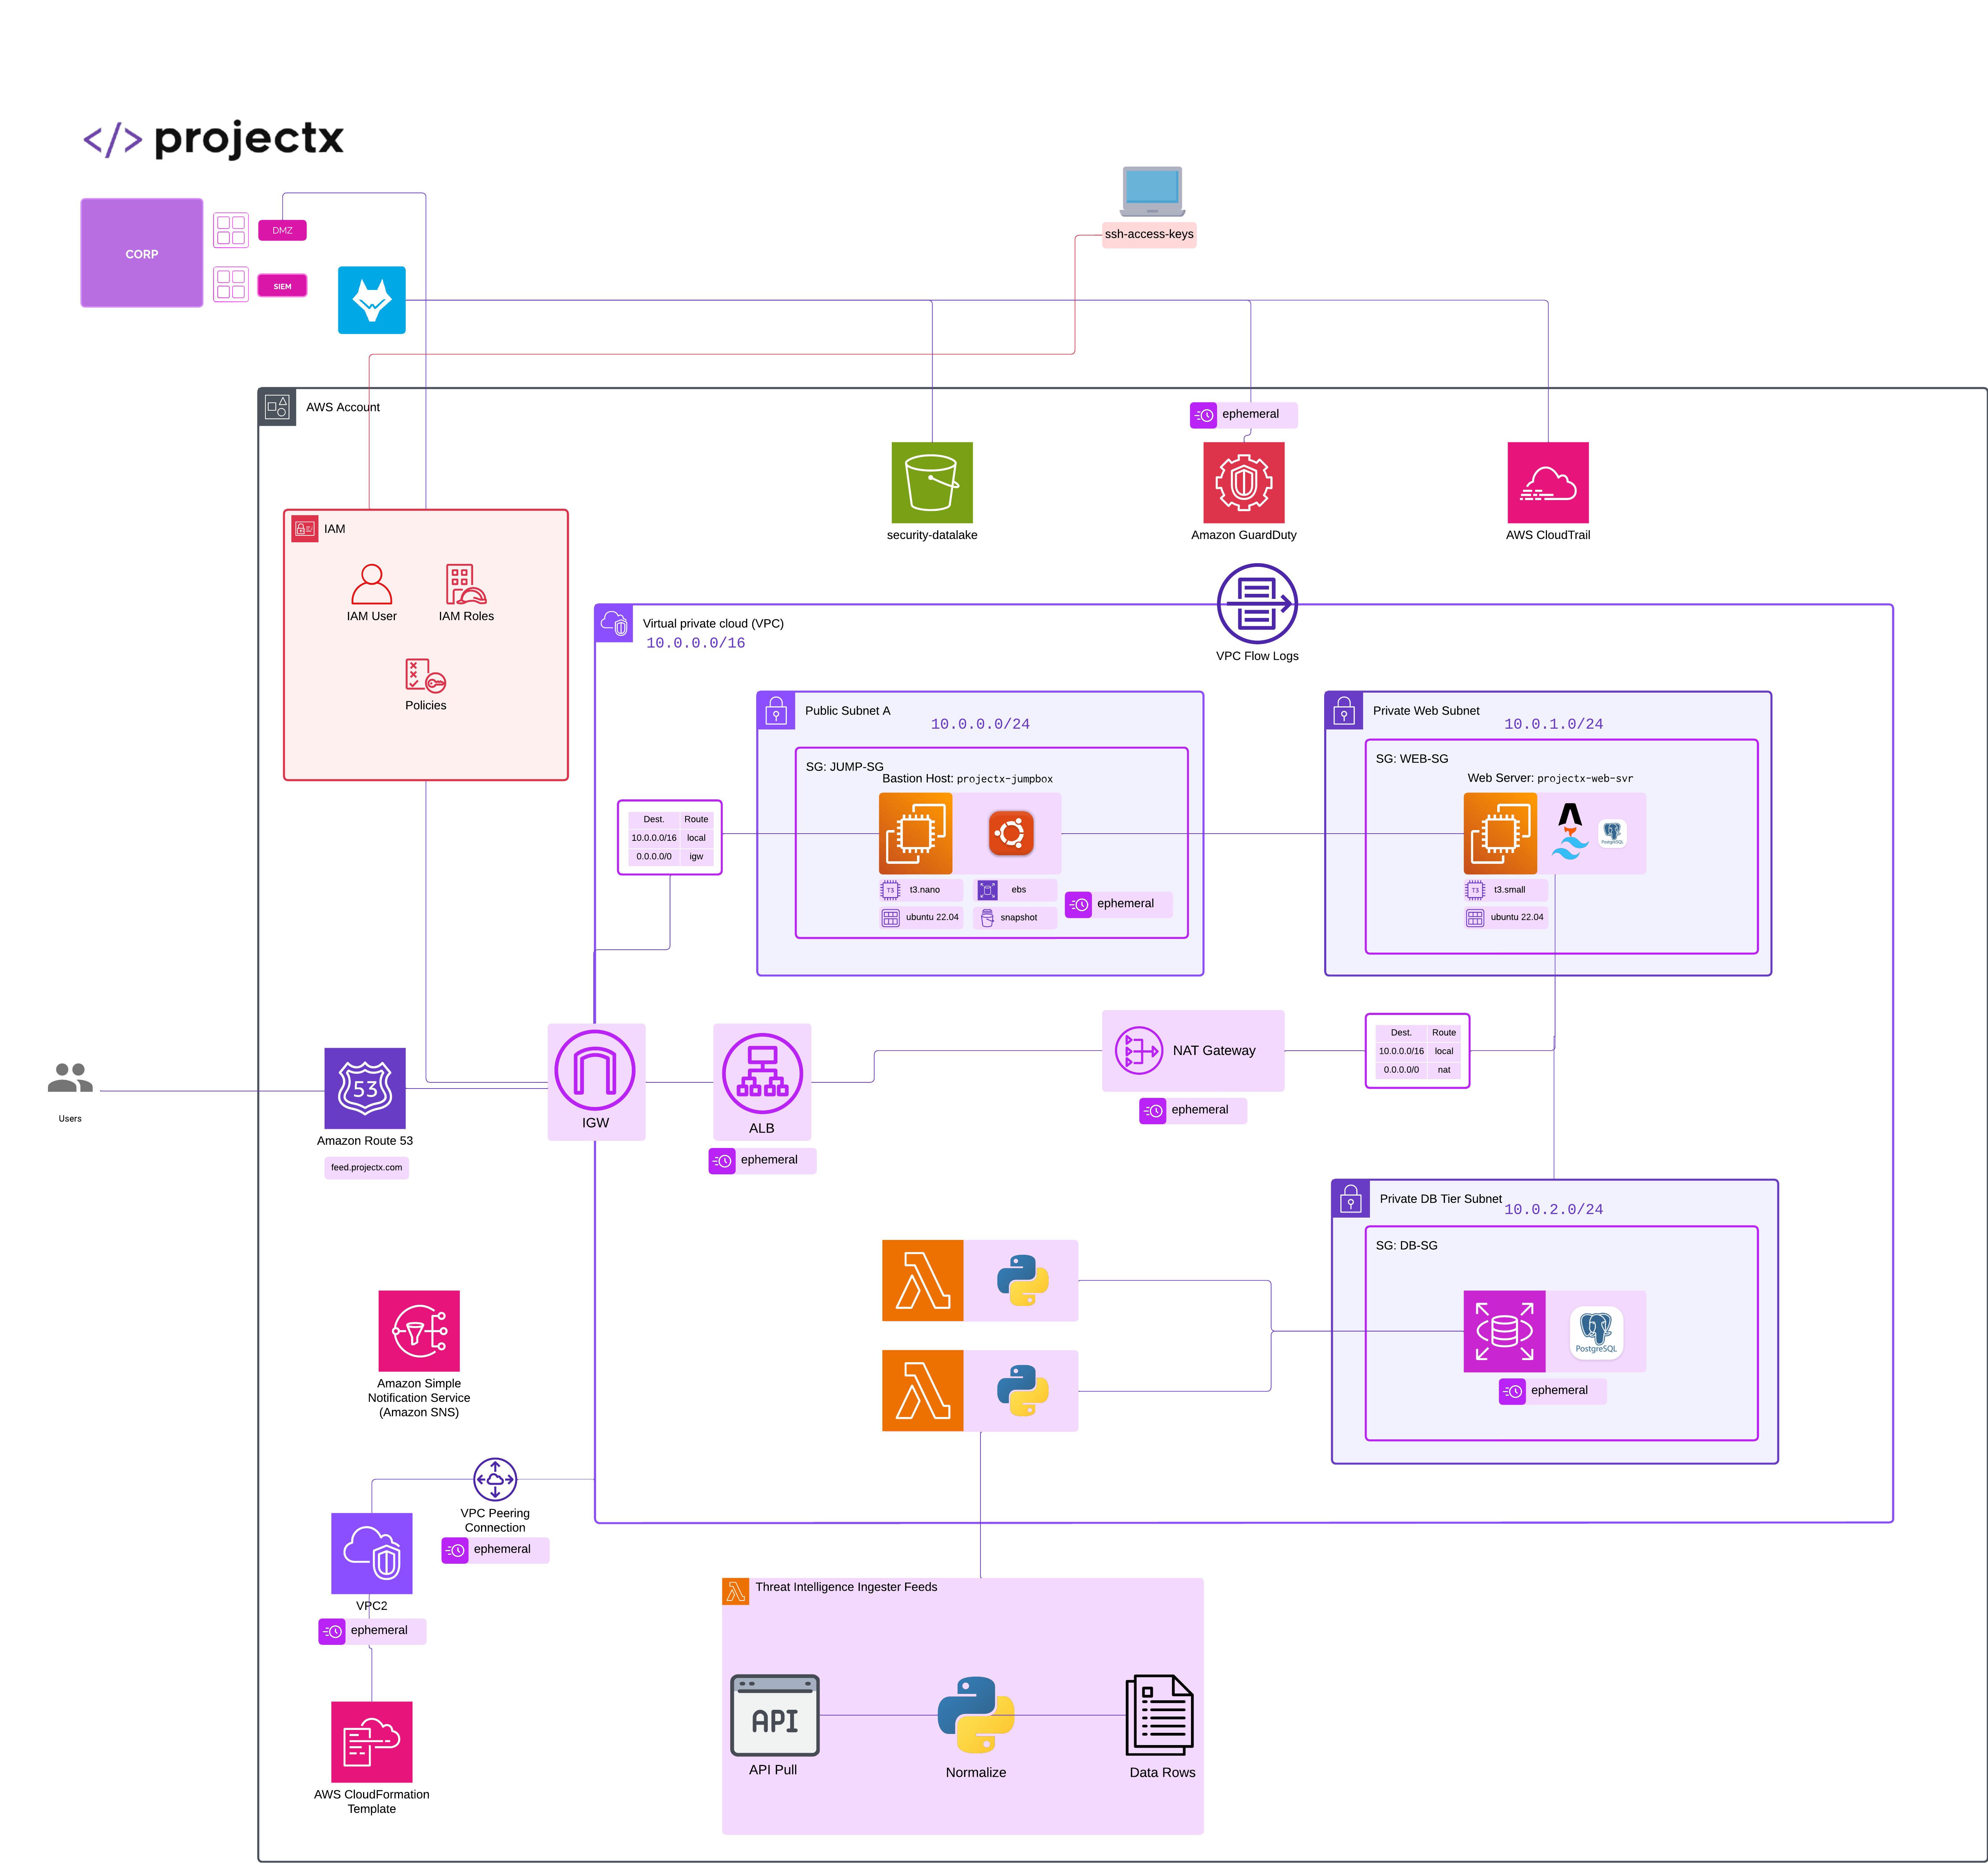
Ephemeral Lab Environment
This guide is for ephemeral lab environments only. The RDS instance created here is temporary and should be deleted after completing the exercises. All data will be lost when the instance is terminated. For production workloads, see ec2_postgres.md for a cost-effective PostgreSQL setup on EC2.
Overview
What is Amazon RDS?
Amazon Relational Database Service (RDS) is a managed database service that makes it easy to set up, operate, and scale relational databases in the cloud. RDS handles database administration tasks such as provisioning, backups, patching, monitoring, and scaling, allowing you to focus on your application.
About PostgreSQL
PostgreSQL is a powerful, open-source relational database management system known for its reliability, feature robustness, and performance. It's widely used for web applications, data analytics, and enterprise workloads.
👉 Part 1 of 2: This guide focuses on creating and configuring the RDS PostgreSQL instance for learning purposes. In Part 2, we'll connect it to projectx-prod-websvr and configure the application to use the database.
Why RDS for Labs?
RDS is used here for educational purposes to demonstrate managed database services. However, for production workloads, running PostgreSQL on EC2 (see ec2_postgres.md) is often more cost-effective while providing similar functionality.
Create Subnet Group for RDS
RDS instances require multi-AZ subnets. In addition to the Private DB Subnet we created earlier, let's create one more, Private DB Subnet 2 in a different Availability Zone.
Open the VPC service in the AWS Console.
In the left navigation pane, select Subnets.
Select your existing Private DB Subnet to view what Availability Zone it is currently in.
Here you can see this one is in the 2c AZ. So we will need to create our Private DB Subnet 2 in either a or b.

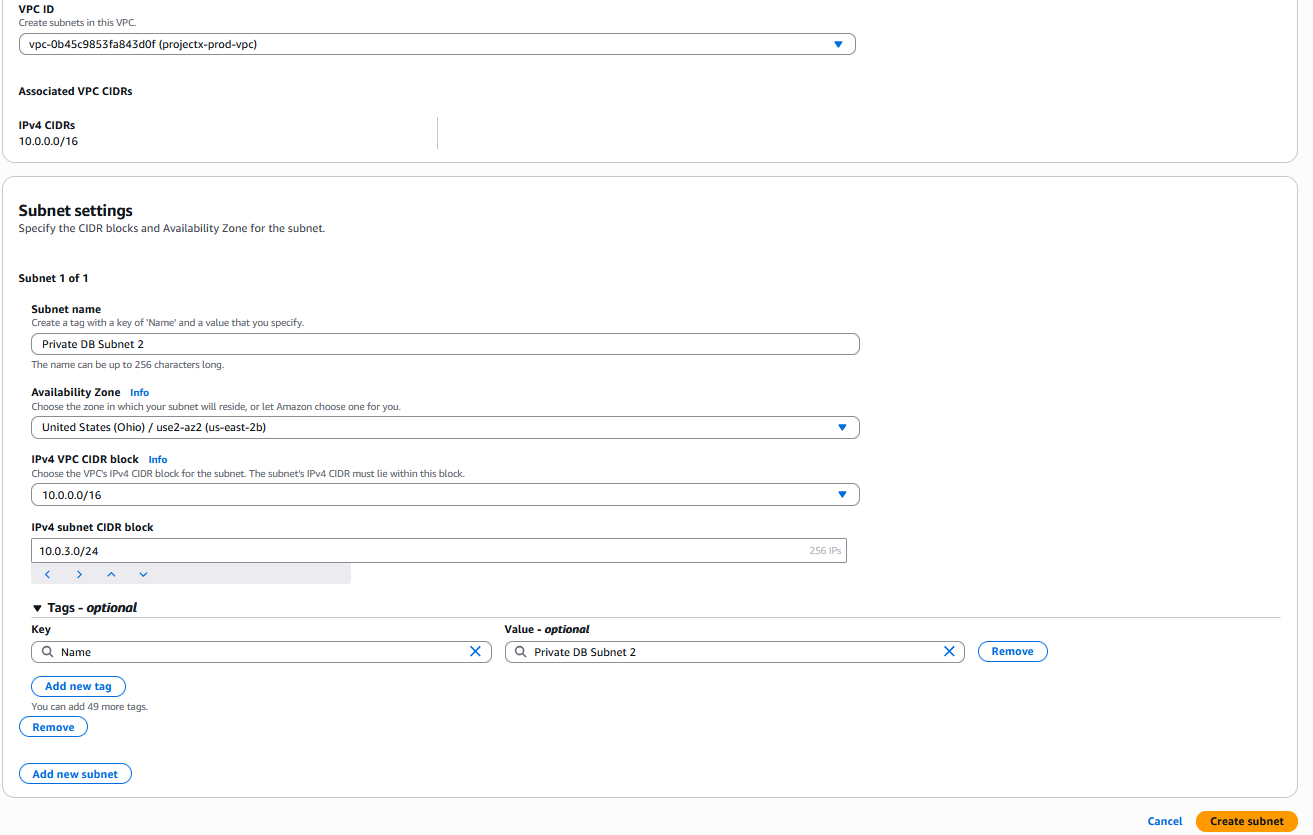
Select Create subnet.
-
VPC: Select
projectx-prod-vpc -
Subnet name:
Private DB Subnet 2 -
Availability Zone:
us-east-2b -
IPv4 subnet CIDR Block:
10.0.3.0/24
👉 We must use a different CIDR block, we will use the 10.0.2.0/24 address space.
Open the Aurora and RDS service in the AWS Console.
In the left navigation pane, select Subnet Groups.
Create Subnet Groups
- Name:
projectx-prod-db-subnet-group - Description: RDS Subnet Group.
- VPC:
projectx-prod-vpc - Availability Zones:
us-east-2bus-east-2c - Subnets:
Private DB SubnetPrivate DB Subnet 2

Create Security Group for RDS
RDS instances need a security group to control access. We'll allow PostgreSQL connections from the web server.
Navigate to Security Groups
Open the VPC service in the AWS Console.
In the left navigation pane, select Security Groups.
Click Create security group.
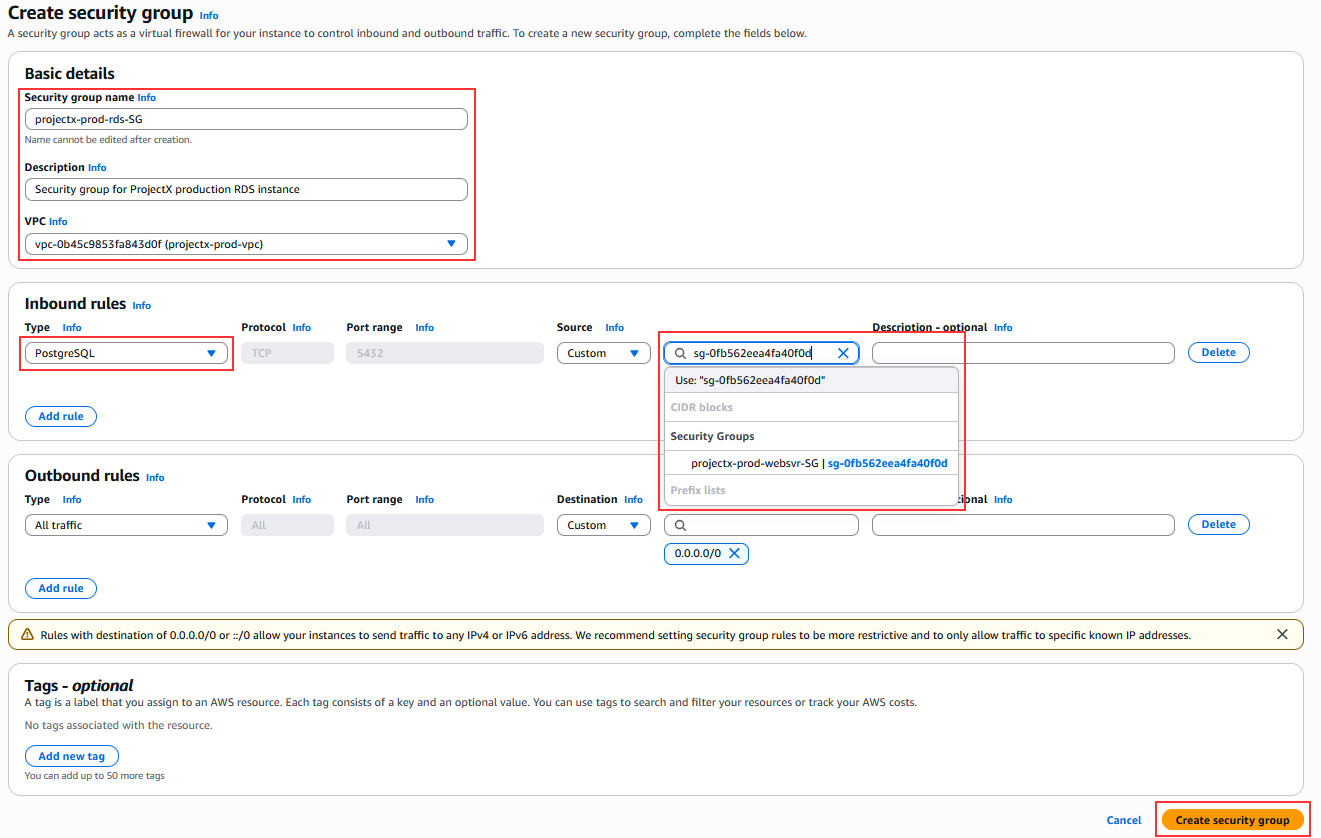
Configure Security Group
Basic Details
- Security group name:
projectx-prod-rds-SG - Description:
Security group for ProjectX production RDS instance - VPC: Select
projectx-prod-vpc
Inbound Rules
Add an inbound rule to allow PostgreSQL connections from the web server:
- Type:
PostgreSQL(orCustom TCP) - Port:
5432(default PostgreSQL port) - Source type:
Security group - Source: Select
projectx-prod-websvr-SG(the security group of your web server)
👉 This restricts database access to only the web server, enhancing security.
Outbound Rules
Leave default (allows all outbound traffic).
Click Create security group.
Create RDS PostgreSQL Instance
Navigate to RDS Databases
Open the Aurora and RDS service in the AWS Console.
In the left navigation pane, select Databases.
Click Create database.
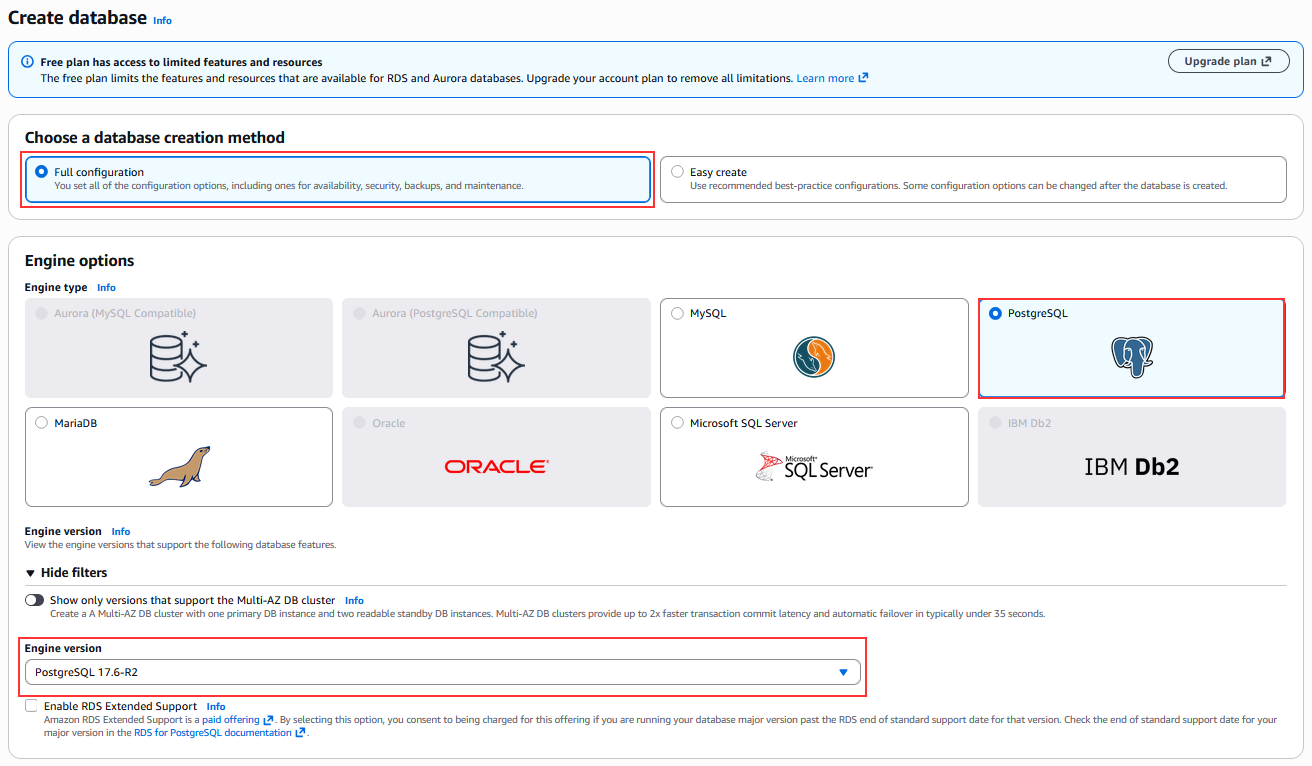
Choose Database Creation Method
Select Full configuration (allows full control over configuration).
Engine Options
-
Engine type:
PostgreSQL -
Version: Select the latest stable version (
PostgreSQL 17.x)
Templates
Select Free tier template.
👉 For this ephemeral lab, we'll use minimal settings to keep costs low. This is for learning purposes only - remember to delete the instance when done!
Settings
Availability and Durability
Leave the default, Single-AZ DB instance deployment (1 instance).
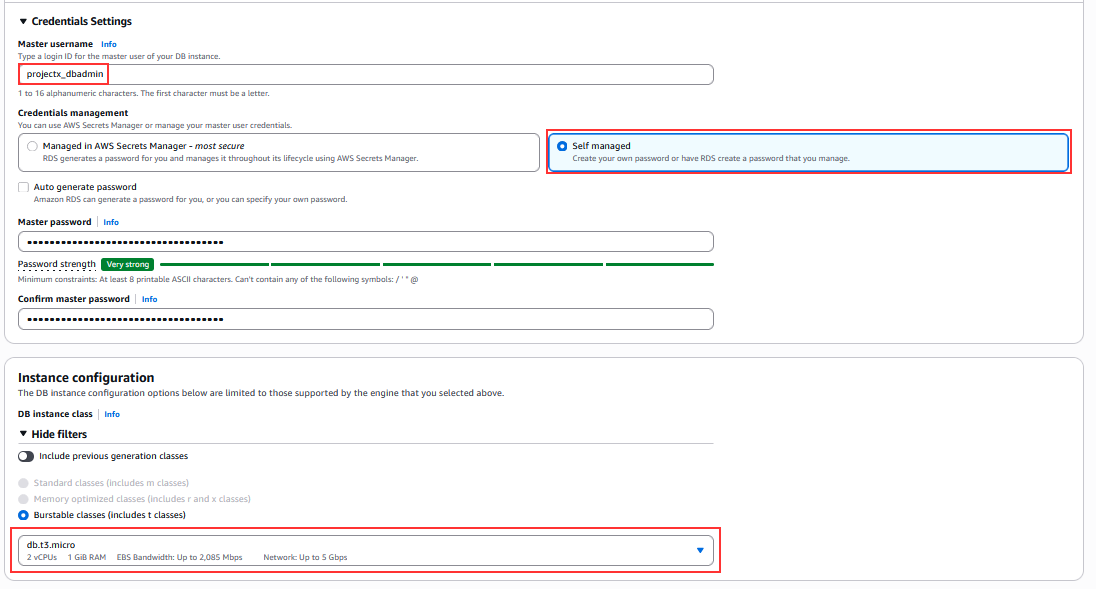
Credentials Settings
- Master username:
projectx_dbadmin -
👉 Use a strong, unique username in production
-
Master password: Create a strong password.
-
Confirm password: Re-enter the password.
👉 Make sure to make note of the password, ideally saving in a password manager.
DB Instance Configuration
-
DB instance identifier:
projectx-prod-rds -
DB instance class: Select
db.t3.micro(2 vCPU, 1 GB RAM) -
👉 These are the smallest and cheapest options suitable for labs
Storage
-
Storage type:
General Purpose SSD (gp3) -
Allocated storage:
20GiB -
👉 Minimum is 20 GiB. This is sufficient for a lab environment.
-
Storage autoscaling: Leave unchecked for this lab (saves costs)
👉 In production, enable storage autoscaling to automatically increase storage when needed.
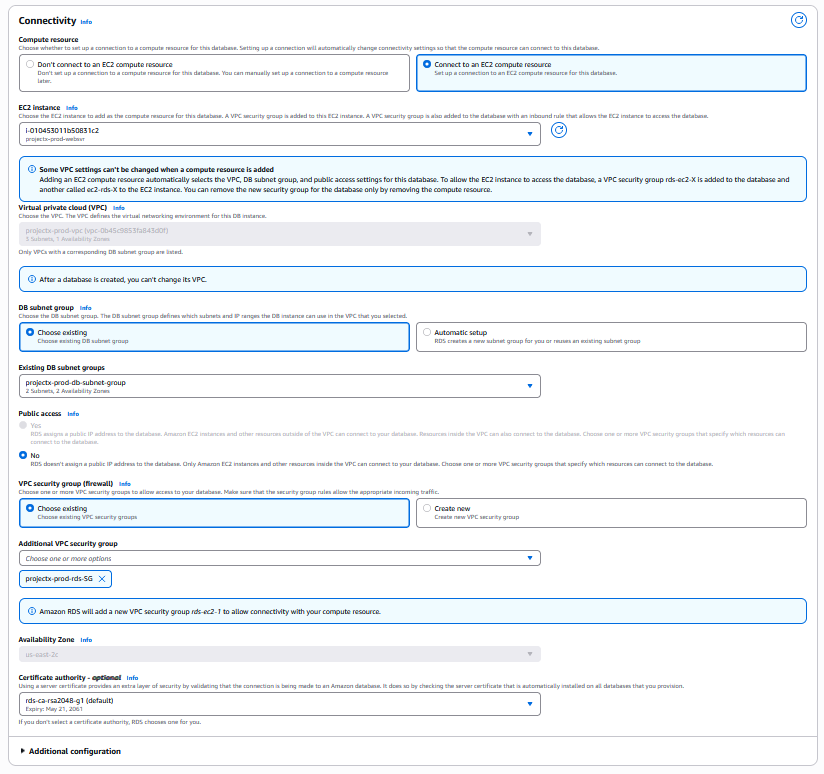
Connectivity
-
Connect to EC2 Instance: Select Button, then the
projectx-prod-websvrEC2 instance. -
Virtual private cloud (VPC): Select
projectx-prod-vpc -
DB subnet group: Select
projectx-prod-db-subnet-group -
Public access: Select No
-
👉 Important: RDS instances should not have public access for security. Access will be through the web server in the same VPC.
-
VPC security group (firewall): Select Choose existing
-
Select
projectx-prod-rds-SG(the security group we created earlier) -
Availability Zone: Leave default (AWS will choose) or select a specific AZ
-
Database port:
5432(default PostgreSQL port)
Database Authentication
- Database authentication: Select Password authentication
👉 In production, consider using IAM database authentication or Kerberos authentication for enhanced security.
Monitoring
- Enhanced monitoring: Leave unchecked for this lab (reduces costs)
Performance Insights
- Enable Performance Insights: Leave unchecked for this lab (reduces costs)
👉 Performance Insights is useful for production troubleshooting but adds cost.
Additional Configuration
Expand Additional configuration:
Initial Database Configuration
-
Initial database name:
projectxdb -
👉 This creates a default database that we'll use in Part 2
Backup
- Automated backups: Select Enable automated backups
- Backup retention period:
1day (minimum, good for labs) - Backup window: Leave default or select a preferred time
👉 For production, use longer retention periods (7-35 days) depending on your requirements.
Encryption
- Encryption: Select Enable encryption
- Encryption key: Use default AWS managed key (
aws/rds)
👉 Encryption at rest is a security best practice and should always be enabled in production.
Maintenance
-
Auto minor version upgrade: Leave unchecked for this lab
-
👉 In production, enable this to automatically receive minor version updates
Deletion Protection
- Enable deletion protection: Leave unchecked for this ephemeral lab
- 👉 Important: Since this is an ephemeral lab environment, we want to be able to delete the instance easily when done. Always delete this RDS instance after completing the exercises to avoid ongoing charges.
Create Database
Review your configuration:
- Engine: PostgreSQL (latest version)
- Template: Free tier or Production (minimal configuration)
- DB instance identifier:
projectx-prod-rds - DB instance class:
db.t3.micro - Storage: 20 GiB gp3
- VPC:
projectx-prod-vpc - Subnet group:
projectx-prod-db-subnet-group - Security group:
projectx-prod-rds-SG - Public access: No
- Database name:
projectxdb - Master username:
projectx_dbadmin - Encryption: Enabled
Click Create database.
The database creation will begin. This typically takes 5-10 minutes.
👉 Note: RDS instance creation takes time. You can monitor the progress in the RDS console. The status will change from "Creating" to "Available".
Monitor Database Creation
Check Database Status
- Navigate to RDS ➔ Databases
- Select your database instance:
projectx-prod-rds - Monitor the Status field
The status will progress through: - Creating: Database is being provisioned - Available: Database is ready to use
👉 You can continue with other tasks while the database is being created. It typically takes 5-10 minutes.

View Connection Details
Once the database status is Available, you can view the connection details:
- Select the database instance:
projectx-prod-rds - Check the Connectivity & security tab
Important information you'll need in Part 2:
- Endpoint: This is the database connection endpoint (e.g.,
projectx-prod-postgres.xxxxxxxxxxxx.us-east-2.rds.amazonaws.com) - Port:
5432(PostgreSQL default port) - VPC security groups:
projectx-prod-rds-SG - Availability Zone: The AZ where the database is running
👉 Save these details along with your master username and password. You'll need them in Part 2 to connect from the web server.

Verify Database Configuration
Check Network Configuration
- Select your database:
projectx-prod-rds - Go to Connectivity & security tab
- Verify:
- VPC:
projectx-prod-vpc - Subnet group:
projectx-prod-db-subnet-group - Publicly accessible:
No✓ - VPC security groups:
projectx-prod-rds-SG
Check Security Group Rules
- Navigate to VPC ➔ Security Groups
- Select
projectx-prod-rds-SG - Verify inbound rule:
- Type: PostgreSQL (or Custom TCP)
- Port: 5432
- Source:
projectx-prod-websvr-SG
👉 This ensures only the web server can connect to the database.
Cost Considerations for Ephemeral Labs
Estimated Costs for This Lab
Generated with ChatGPT.
For a minimal RDS configuration (db.t3.micro, 20 GiB):
- Instance: ~\(0.017/hour (~\)0.40/day) for
db.t3.micro - Storage: ~\(0.115/GB-month for gp3 (20 GiB = ~\)2.30/month)
- I/O requests: Minimal for lab usage
- Backups: ~$0.095/GB-month for backup storage
👉 Total estimated cost: ~$0.50-1.00/day for the RDS instance
Delete When Done!
CRITICAL: This is an ephemeral lab environment. Remember to delete the RDS instance and related resources immediately after completing Part 2 to avoid ongoing charges! Set a reminder or calendar event to ensure you don't forget.
Free Tier Eligibility
RDS offers a free tier for 12 months for new AWS accounts:
- db.t2.micro or db.t3.micro instance class
- Up to 20 GB of General Purpose SSD storage
- 20 GB of backup storage
If you're within the free tier period, this lab should be free or very low cost.
Production Alternative
For production workloads, consider using PostgreSQL on EC2 (see ec2_postgres.md) which can save approximately 40% in costs compared to RDS while providing similar functionality.
What's Next?
In Part 2, we'll:
- Connect to the RDS instance from projectx-prod-websvr
- Install PostgreSQL client tools
- Create database schemas and tables
- Configure the web application to use the database
- Test the database connection
Important Information for Part 2
Save the following information securely:
- Database Endpoint:
projectx-prod-postgres.xxxxxxxxxxxx.us-east-2.rds.amazonaws.com - Port:
5432 - Database Name:
projectxdb - Master Username:
projectx_dbadmin - Master Password:
[your-password]
👉 You'll need all of this information in Part 2 to connect from the web server.
Ephemeral Lab - Delete After Use
Remember: This is Part 1 of 2 for an ephemeral lab environment.
- Keep the database running until Part 2 is complete
- After completing Part 2 and testing the connection, DELETE the RDS instance immediately
- All data will be lost when the instance is terminated - this is expected for lab environments
- Set a reminder to delete the instance to avoid unexpected charges
For production workloads, use the PostgreSQL on EC2 setup described in ec2_postgres.md.